• Home
  • Blog Categories
    • AdWords
    • Facebook
    • Amazon
    • eCommerce
    • Lead Generation
    • Google Exams
  • Blog Archive

PPC Wins

Tips & strategies for getting the most from your PPC campaigns

Get Google Shopping Stars FREE for your eCommerce Store (Aka Seller Ratings)

September 18, 2017 By John King Leave a Comment

Hey folks! Want to share some exciting news for eCommerce owners.

Google recently opened up a program called ‘Customer Reviews’. It allows store owners to collect customer reviews, which can later be used as ‘seller ratings’.

Allowing you to show “stars” in your ads, like this:


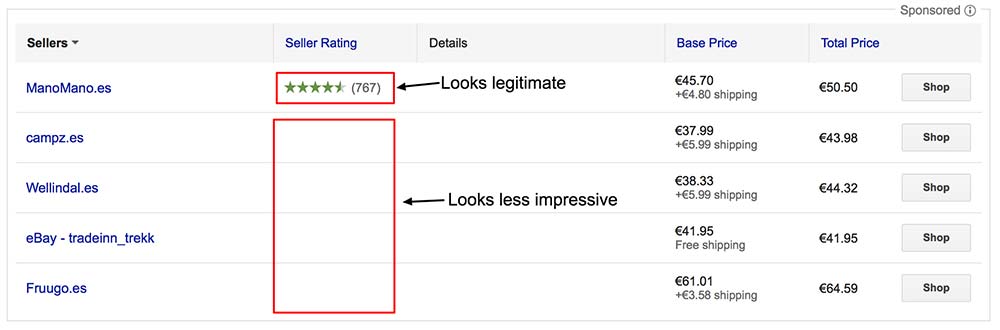
And also, allowing you to show stars in the Google Shopping comparison, to build social proof that you are a trustworthy seller:

On top of that… Google also let you add a reviews widget on your site, so you can show off to prospective customers (assuming you have a good star rating!). The badge looks like this:

This program has been live for a while. But if you had your store on Shopify you could only use it if you upgraded to Shopify Plus. This was down to a stipulation by Google that your checkout pages had to be on your domain. Until recently, all Shopify checkout URLs were on the Shopify domain (checkout.shopify.com). Fortunately they recently changed this, and your store should have its own domain in the checkout URL (you can confirm this by adding something to the cart, and seeing what the URL is when you go to checkout).

If your checkout URL is your domain; you’re good to go!

So how do you set this up?

For the self learners, here’s the Google instructions for how to implement:
https://support.google.com/merchants/answer/7124018

Come back to this post if you’re using Shopify, and want a list of the liquid variables to use.

Here’s are the basic initial steps:

  1. Create and/or log in to your Google Merchant centre account
  2. Ensure your Merchant Center account is verified and claimed
  3. Click the 3-dot icon dropdown in the upper right corner
  4. Select Merchant Center programs from the dropdown menu options
  5. From the Merchant Center programs page, navigate to the Google Customer Reviews card
  6. Click Get started to sign up
  7. Agree to Google Customer Reviews program agreement
  8. Check that Google Customer Reviews appears in your account

Next, for the code we need to add:

<!-- BEGIN GCR Opt-in Module Code -->
<script src="https://apis.google.com/js/platform.js?onload=renderOptIn"
  async defer>
</script>

<script>
  window.renderOptIn = function() { 
    window.gapi.load('surveyoptin', function() {
      window.gapi.surveyoptin.render(
        {
          // REQUIRED
          "merchant_id":"MERCHANT_ID",
          "order_id": "ORDER_ID",
          "email": "CUSTOMER_EMAIL",
          "delivery_country": "COUNTRY_CODE",
          "estimated_delivery_date": "YYYY-MM-DD",

          // OPTIONAL
          "opt_in_style": "OPT_IN_STYLE"
        }); 
     });
  }
</script>
<!-- END GCR Opt-in Module Code -->

Next, we need to replace all the capitalized values that are surrounded by “<” and “>” characters.

Some of these will feature fixed values, and some will need dynamic values.

How to fill these out:

Variable Required? Description
MERCHANT_ID Required Your Merchant Center ID. You can get this value from the Google Merchant Center.
ORDER_ID Required A unique ID for the order. Will need a dynamic code if you’re using something like Shopify/Magento/BigCommerce
CUSTOMER_EMAIL Required The customer’s email address, in the format [email protected].
COUNTRY_CODE Required The two-letter country code identifies where the customer’s order will be delivered. This value must be in ISO 3166-1 alpha-2 format. For example, “US”.
YYYY-MM-DD Required The estimated delivery date for the order, where YYYY is the year, MM is the month, and DD is the day. For example, “2016-09-13”.
OPT_IN_STYLE Optional Specifies how the opt-in module’s dialog box is displayed. Possible values are:

  • “CENTER_DIALOG”: Displayed as a dialog box in the center of the view.
  • “BOTTOM_RIGHT_DIALOG”: Displayed as a dialog box at the bottom right of the view.
  • “BOTTOM_LEFT_DIALOG”: Displayed as a dialog box at the bottom left of the view.
  • “TOP_RIGHT_DIALOG”: Displayed as a dialog box at the top right of the view.
  • “TOP_LEFT_DIALOG”: Displayed as a dialog box at the top left of the view.
  • “BOTTOM_TRAY”: Displayed in the bottom of the view.

The default value is “CENTER_DIALOG”.

Code for Shopify:

Code to Replace Shopify Snippet to Use
ORDER_ID {{order.name}}
CUSTOMER_EMAIL {{customer.email}}
COUNTRY_CODE {{shipping_address.country_code}}
YYYY-MM-DD {{ order.created_at | date:’%s’ | plus:604800 | date:”%F” }}

For the YYYY-MM-DD option – where you want to record the estimated shipping time. The Shopify code above basically sets a time (in this case 604800 seconds, or in other words, a week) since the date of the order. There’s 86400 seconds in a day, so you can base off that number to get a time accurate for your store.

For example, adding 5 days after order creation would look like:
{{ order.created_at | date:’%s’ | plus:432000 | date:”%F” }}

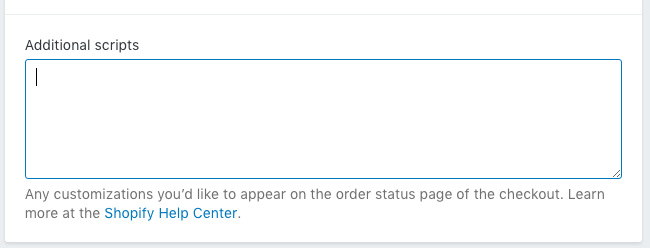
All this code needs to be added to the Shopify Admin, under Settings > Checkout > Additional Scripts.

One key thing to check is that the quotes are in plain text. Quite often when copying them, the single quotes need retyping. If they’re not in plain text, it could break the JS code. The error below is an example of a (likely) copy and paste issue:

Confirm its working by viewing the page source on one of your checkout page URLs. If you’re using AdWords conversion tracking, or a Facebook ads pixel, you should be able to retrieve a checkout URL from there. Alternatively, create a dummy order, and save the checkout URL from that.

Additionally, check the javascript by opening Console in Google Chrome’s Inspector tool.

Once you have enough reviews, you can then proceed to add the reviews badge/widget to your page using these instructions.

If someone knows the equivalent dynamic variables for Magento, BigCommerce or any other major eCommerce platform, please add it in the comments :)

How to Track ROAS in AdWords (Return on Ad Spend)

May 7, 2017 By John King Leave a Comment

This is a quick post to cover ROAS in Google AdWords. When it comes to selling things on AdWords, there’s two things you really want to optimize for, sales volume, and return on ad spend. You want to get as many sales as possible (volume), but you want to do so whilst spending as little as possible (where ROAS comes in).

Another popular metric to track is cost per conversion (aka cost per acquisition (CPA)). The problem with this metric, is that it doesn’t differentiate between big orders and small orders.

If one month, I get a lower overall CPA than last month, but each order is for a small amount, I haven’t really won. ROAS takes into account every cent of each sale.

So how do we go about tracking this?

Firstly, its imperative to ensure your conversion tracking is setup correctly, and recording the conversion value of each sale. You want to make sure you’re dynamically adjusting the conversion value section based upon the eCommerce software you’re using. And you want also want to ensure you’re not recording any duplicate conversions.

If you’re on Shopify, check out my guide for how to do this.

After that, its simply a case of adding the correct column to your AdWords dashboard. The column is named “Conv. value / cost”.

The output that you’ll see from this column will be something like “5.21”. And the way to understand it, is that it refers to the number of dollars (or the currency unit you’re using) returned for each dollar of AdWords spend. In this example, it would be $5.21 dollars returned, for each dollar spent. Higher = better. Lower = worse.

Example of the column used in AdWords

Supermetrics Review – Save Time Analyzing & Reporting on Your PPC Campaigns

March 20, 2017 By John King Leave a Comment

Supermetrics can be an incredibly useful tool for both account management and client reporting. It’s a very time efficient way to compile all your marketing data into Google Sheets, and monitor performance at a glance. In this article I’m going to run through the why and how of Supermetrics.

I began using Supermetrics about 2 years ago, for a variety of reasons:

  • Needed one place I could view all my marketing campaign results (Bing Ads, Facebook Ads, and of course, AdWords). Why? Because loading each platform individually is painfully slow. When you factor in time taken to setup the correct data view you want.
  • Wanted to be able to define a number of different views simultaneously. Specifically the current months performance + year to date performance. All while comparing with YoY data to see long term performance trends. This important to business owners when they are seeking to get growth in their business.
  • Lastly, not only would this data be useful for at a glance performance management, I wanted to use it for reporting purposes also.

Intro to how Supermetrics works

Supermetrics runs within Google Sheets, and allows you to pull data from all the top ad platforms. You can pull the data in a variety of formats:

  • Specific time periods
  • Compared with YoY metrics
  • Using filters to track specific campaigns or data segments

And then you can manipulate the data in whatever way best suits your metrics. Using all the regular spreadsheet tools you’re used to (formulas, conditional formatting, pivot tables, etc)

The “cool” thing about Supermetrics running within Sheets as opposed to Excel, is that you can schedule sheets to update at multiple times during the day. That way, when you check your metrics, they’re never far from the real-time data. Which wouldn’t be possible if the plugin used regular Excel.

Who’s it for?

Supermetrics is for those who want to pull ad data from multiple sources (AdWords, Bing, Facebook etc) and be able to view the metrics all in one place. You could be an individual who likes to keep strict tabs on his performance, or you could be an agency managing multiple accounts, and wants to save time and streamline account analysis and reporting.

You can certainly replicate this kind of thing manually, but it comes at a time cost that may be unacceptable.

Integrations available:

So far I’ve only used 3 integrations (Google Ads, Facebook & Bing), but there are much more available. The main ones being:

  • Google Ads
  • Facebook Ads
  • Bing Ads
  • Instagram
  • Google Analytics
  • YouTube
  • DoubleClick
  • Twitter Ads
  • Pinterest
  • Stripe
  • Mailchimp
  • Moz, SEMRush, Yahoo Gemini

And its this flexibility, that makes it a swiss army knife for crunching numbers, building dashboards and doing reporting.

How it works within Google Sheets

To install the add on for Google Sheets, navigate to the Supermetrics site, and hit the red “try for free” button. This will take you to the Chrome web store, where you can install the plugin. Once installed, you will see Supermetrics as an option within Add Ons:

There’s a few options in here. The one we want to kick things off is Launch Sidebar. Click that, and you’ll see a sidebar that looks like the following:


And its this dialog box that gives you the options to configure how you display data. To get something really useful, you need to setup a number of different tables for data. That allows for different time periods and data sources.

Here’s an example of the Supermetrics workflow:

How I use it for eCommerce PPC reporting

Here is an example of a dashboard that I use for an eCommerce client. Its a reasonable demonstration of how much data is being pulled and manipulated. Rather than pulling directly from Supermetrics into this spreadsheet, I pull into separate sheets for each data source (to keep things “clean”), and then reference those cells in this sheet.

Example Supermetrics Dash. Worth noting that the green/red highlighting isn’t a SM feature, instead you can achieve this through ‘conditional formatting’ built into Sheets.

Supermetrics Templates Gallery

The above example is very specific to a certain type of client with certain types of goals (YoY eCommerce growth). However, for example with a lead generation campaign, you might build something quite different.

In addition to building reports from the ground up, you can also construct them from Supermetrics’ template gallery. You simply select the template you want to use, add your data source (AdWords, Facebook or Bing), and the view gets dynamically built out in seconds.

These can be seen as a “step 1” if you’re unsure where to begin with Supermetrics. Or for more advanced users, it can be a time-saving feature to access greater reporting granularity.

The below video demos a few of the templates I’ve found useful:

Supermetrics Alternatives?

Initially when Supermetrics was released it was a free tool, and has gradually become more expensive. At the latest renewal period I took a look around to see if there was a better (perhaps more affordable?) alternative.

When I started looking into the alternatives, I noticed that most work within a web interface, rather than through a spreadsheet. This has its pros and cons. The pros hinge largely on the ability to provide great visualisations of data. Nice graphics and colors for example. The cons relate largely to customisation. Whilst it’s possible to have infinite customisation within a web interface, the practicality thus far was that they’re mostly limited to a fixed set of configurations.

Personally I need to be able to customise the data that’s being shown. For example, with some clients they have legacy conversion data that is inaccurate (from issues with conversion tracking pixels), so I need to be able to make manual adjustments such that their data is accurate. And there further examples I could go into where the flexibility of spreadsheets is v. much welcomed.

There was one alternative, called Analytics Edge, that works within a spreadsheet. My issue with this one was that it uses Excel, rather than Google Sheets. The upside to using a cloud based System like sheets, is that you can set it to auto-refresh at different points during the day/night. That way, when you open the sheet, the data is already relatively up to date.

So with this in mind, I’ve just included a cursory overview of the alternatives below:

Analytics Edge

As mentioned above, Analytics Edge is an Excel plugin similar to Supermetrics. Its $75 per year, with an extra $50 for each “connector”. It offers connectors such as Bing, AdWords, Facebook and more. Whilst relatively cheap from the offset, it can add up if you require a lot of connectors.

Report Garden

Report Garden utilises a web interface to allow for a wide range of tables and graphs. Part of their focus is to create dashboards you can share with and send to your clients. To get similar functionality to Supermetrics (AdWords, Bing Ads, Facebook Ads) its $169 per month. Which is certainly viable for agencies (as you get 4o user accounts), but likely too expensive for small outfits.

Report Dash

Report Dash has a lot in common with Report Garden. It looks like its less polished, less popular, but more affordable younger brother. It also features a wide range of possible connectors. Plans comparable to Supermetrics start from $79 per month.

Report Dash Screenshot

Conclusion

Since discovering Supermetrics, it has gone from a useful tool to a “must have” for me. This comes down to a number of factors:

  • Manually extracting numbers from different ad platforms is monotonous and error prone. Avoiding this process is a big efficiency and sanity win.
  • Sometimes, due to platforms’ slow loading times, it can be tempting to check on metrics each week rather than every few days. But with ALL the metrics going into spreadsheets, it’s very convenient and easy to open them up regularly and check performance.
  • It saves valuable TIME each week

For a small business owner like myself, it would be great if there was a more affordable option than $49 per month. Essentially it’s the same cost whether I run one business, or manage a client portfolio of 10+.

But when I calculate the time Supermetrics saves each month (measured in hours rather than minutes), and then calculate it as an hourly rate, it’s a very easy decision to continue using it.

Whilst I use and appreciate Google’s Data Studio, it doesn’t let me pull AdWords, Bing Ads and Facebook Ads automatically all into a single spreadsheet.

So until there’s a competitor which does the job better, this is the tool I use.

How to setup AdWords Conversion Tracking for Shopify

November 2, 2016 By John King 34 Comments

Its very useful, when you’re running AdWords campaigns, to correctly track conversions (conversions in eCommerce generally = sales).

If you don’t do this, its hard to optimize your campaigns and make more $$$.

In this post I’m going to show you how to setup AdWords conversion tracking for Shopify.

CRUCIALLY, I’m going to show you how to add code that avoids tracking duplications. That is to say, it will prevent a sale for appearing as 2 or more conversions, when there was only one! (yes, this happens sometimes).

To check if you’ve been getting duplicate conversions in AdWords, go to Tools in the top bar, then conversions. Then from the conversions page, choose webpages from the left side:

adwords-conversions-webpages

Set the time period you’re look at to All Time, or at least 30+ days. This should give us enough conversion data to work with. Then sort the list of results in descending order by clicking All Conversions.

If any of the pages have more than one conversion (such as below), you know you’ve been hit with duplicate Shopify conversions:

adwords-duplicate-conversions

In order to setup AdWords conversion tracking correctly, this is the process we are going to follow:

  1. Get conversion code from AdWords
  2. Edit the code, so that we add in custom code for Shopify
  3. Paste the edited code into a box in your Shopify admin panel

1/ Get conversion code from AdWords

In your AdWords account, choose Tools and then Conversions

adwords-conversion-tracking-link

And then you want to choose + Conversion

setup-new-conversion


Then choose Website Conversion


adwords-conversions

Then choose the following settings:

  • Name: Shopify Sale
  • Value: Each conversion has a different value. If there’s no value, use $1
  • Count: Every Conversion
  • Conversion Window: 30-day conversion window
  • Category: Purchase/Sale
  • Include in “Conversions”: Yes
  • Attribution model: Use “Last Click” model

choose-conv-settings


Then choose Save and continue

At which point you will get the snippet of code that you need:

conv-code-page

The code will look like this:

<!-- Google Code for Shopify Sale Conversion Page -->
<script type="text/javascript">
/* <![CDATA[ */
var google_conversion_id = your-id;
var google_conversion_language = "en";
var google_conversion_format = "3";
var google_conversion_color = "ffffff";
var google_conversion_label = "your-label";
var google_conversion_value = 1.00;
var google_conversion_currency = "USD";
var google_remarketing_only = false;
/* ]]> */
</script>
<script type="text/javascript" src="//www.googleadservices.com/pagead/conversion.js">
</script>
<noscript>
<div style="display:inline;">
<img height="1" width="1" style="border-style:none;" alt="" src="//www.googleadservices.com/pagead/conversion/your-id/?value=1.00&amp;currency_code=USD&amp;label=your-label&amp;guid=ON&amp;script=0"/>
</div>
</noscript>


Now we want to modify it with the following changes:

We want to change the line:

var google_conversion_value = 1.00;


to

if ({{ subtotal_price }}) { var google_conversion_value = {{ subtotal_price | money_without_currency | remove: ',' }}; }

Lastly, you’ll want to edit the part of the noscript tag that contains the value. Change

value=1.00

to

value={{ subtotal_price | money_without_currency | remove: ',' }}


Making the above code look like this:

<script type="text/javascript">
/* <![CDATA[ */
var google_conversion_id = your-id;
var google_conversion_language = "en";
var google_conversion_format = "3";
var google_conversion_color = "ffffff";
var google_conversion_label = "your-label";
if ({{ subtotal_price }}) { var google_conversion_value = {{ subtotal_price | money_without_currency | remove: ',' }}; }
var google_conversion_currency = "USD";
var google_remarketing_only = false;
/* ]]> */
</script>
<script type="text/javascript" src="//www.googleadservices.com/pagead/conversion.js">
</script>
<noscript>
<div style="display:inline;">
<img height="1" width="1" style="border-style:none;" alt="" src="//www.googleadservices.com/pagead/conversion/your-id/?value={{ subtotal_price | money_without_currency | remove: ',' }}&amp;currency_code=USD&amp;oid={{order.order_number}}&amp;label=your-label&amp;guid=ON&amp;script=0"/>
</div>
</noscript>

Next, we want to add some code to track order IDs. This is the bit that will prevent us registering duplicate conversions in AdWords. See the Google article for extended details on how it works.

We will add the following line:

if ({{ order.order_number }}) { var google_conversion_order_id = "{{ order.order_number }}"; }

Essentially the code says; check if the page returns an order number, and if so, pass it to the variable.

You may want to check your order number setup in Shopify, because if you edited it, and want it to match up, you’ll need to add an extra prefix. I don’t think you need it to match up 100% though. All this functions serves to do is ensure the same order number can’t be counted twice.

Then we want to add the corresponding noscript tag:

&amp;oid={{ order.order_number }}

Making the code look like this:

<script type="text/javascript">
/* <![CDATA[ */
var google_conversion_id = your-id;
var google_conversion_language = "en";
var google_conversion_format = "3";
var google_conversion_color = "ffffff";
var google_conversion_label = "your-label";
if ({{ subtotal_price }}) { var google_conversion_value = {{ subtotal_price | money_without_currency | remove: ',' }}; }
if ({{ order.order_number }}) { var google_conversion_order_id = "{{ order.order_number }}"; }
var google_conversion_currency = "USD";
var google_remarketing_only = false;
/* ]]> */
</script>
<script type="text/javascript" src="//www.googleadservices.com/pagead/conversion.js">
</script>
<noscript>
<div style="display:inline;">
<img height="1" width="1" style="border-style:none;" alt="" src="//www.googleadservices.com/pagead/conversion/your-id/?value={{ subtotal_price | money_without_currency | remove: ',' }}&amp;currency_code=USD&amp;oid={{ order.order_number }}&amp;label=your-label&amp;guid=ON&amp;script=0"/>
</div>
</noscript>


At which point we’re nearly there.

Finally, we have the option to add some further code.

Shopify have a snippet of liquid code called first_time_accessed (more info on it here). Code placed within this statement *should* only be displayed once.

Since testing it, I’ve found its not 100% reliable. Hence adding the above order ID code.

But it’s better than nothing for the other codes in your checkout code. Ones that don’t have an order ID parameter that can be added (Bing comes to mind).

All you have to do is surround your conversion code with the statement:
{% if first_time_accessed %}

and then close it with:
{% endif %}

All this code goes in the Additional Scrips box in your Shopify dashboard. This section can be located by going to Settings -> Checkout. Scroll down until you find this box:

shopify-additional-scripts-box

If any of the above isn’t clear, leave me a comment, and I’ll clarify + improve it.

PPC Account Managers = Factory Workers. Improving The Agency Business Model

May 11, 2015 By John King 2 Comments

When I walked in to my first PPC agency I saw a sea of employees at their desks, and my initial thought was; this looks like a modern day factory. [Read more…]

Next Page »

Popular Posts

First Time Here?

Hey and welcome to the site.

PPC Wins is a site dedicated to sharing with you useful tips and advice for getting the most out of PPC campaigns.

If there is a topic you would like to see covered please get in contact.

Categories

  • AdWords
  • Amazon
  • eCommerce
  • Facebook
  • Google Analytics
  • Google Exams
  • Lead Generation
  • Uncategorized
google-adwords-certified-partner2
BingAds_Accredited_Badge (1)

Copyright © 2022 ppcwins.com