• Home
  • Blog Categories
    • AdWords
    • Facebook
    • Amazon
    • eCommerce
    • Lead Generation
    • Google Exams
  • Blog Archive

PPC Wins

Tips & strategies for getting the most from your PPC campaigns

How to setup AdWords Conversion Tracking for Shopify

November 2, 2016 By John King 34 Comments

Its very useful, when you’re running AdWords campaigns, to correctly track conversions (conversions in eCommerce generally = sales).

If you don’t do this, its hard to optimize your campaigns and make more $$$.

In this post I’m going to show you how to setup AdWords conversion tracking for Shopify.

CRUCIALLY, I’m going to show you how to add code that avoids tracking duplications. That is to say, it will prevent a sale for appearing as 2 or more conversions, when there was only one! (yes, this happens sometimes).

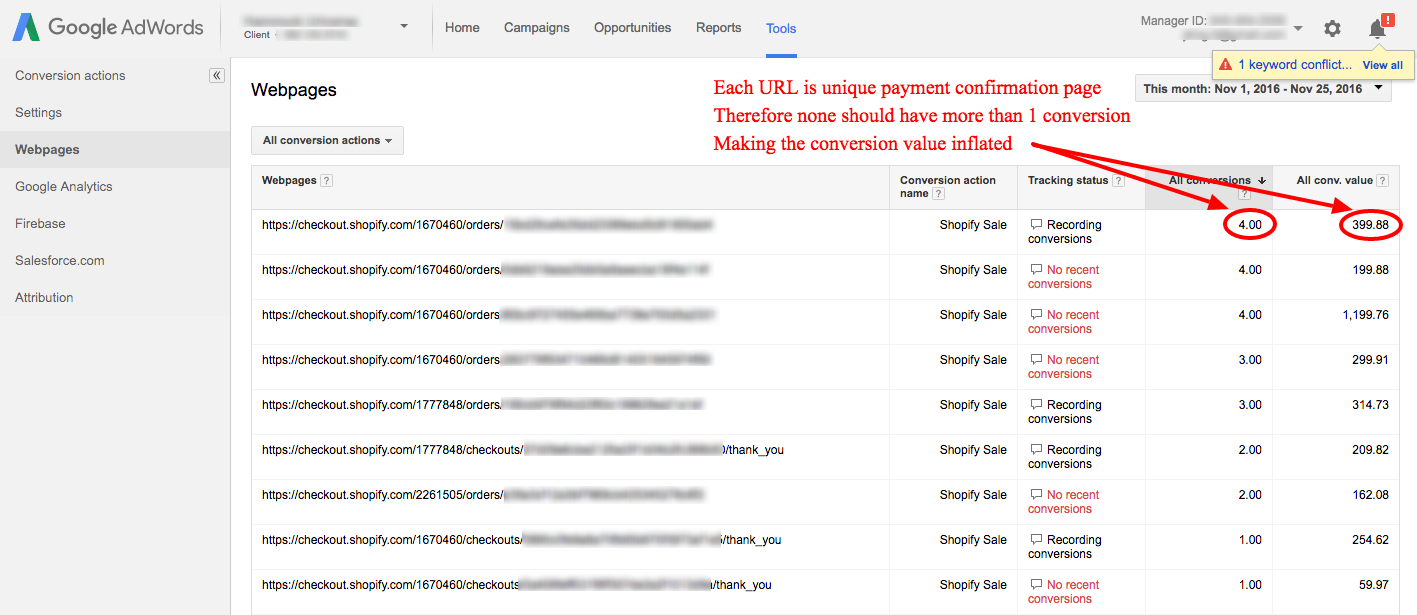
To check if you’ve been getting duplicate conversions in AdWords, go to Tools in the top bar, then conversions. Then from the conversions page, choose webpages from the left side:

adwords-conversions-webpages

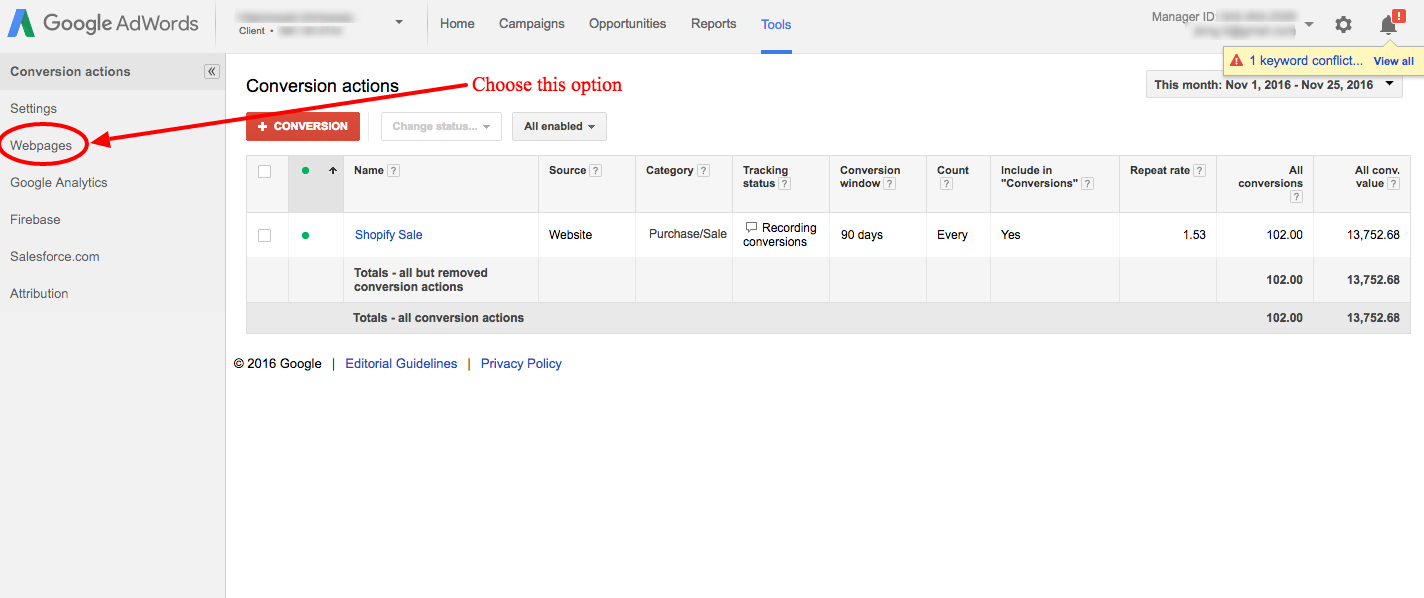
Set the time period you’re look at to All Time, or at least 30+ days. This should give us enough conversion data to work with. Then sort the list of results in descending order by clicking All Conversions.

If any of the pages have more than one conversion (such as below), you know you’ve been hit with duplicate Shopify conversions:

adwords-duplicate-conversions

In order to setup AdWords conversion tracking correctly, this is the process we are going to follow:

  1. Get conversion code from AdWords
  2. Edit the code, so that we add in custom code for Shopify
  3. Paste the edited code into a box in your Shopify admin panel

1/ Get conversion code from AdWords

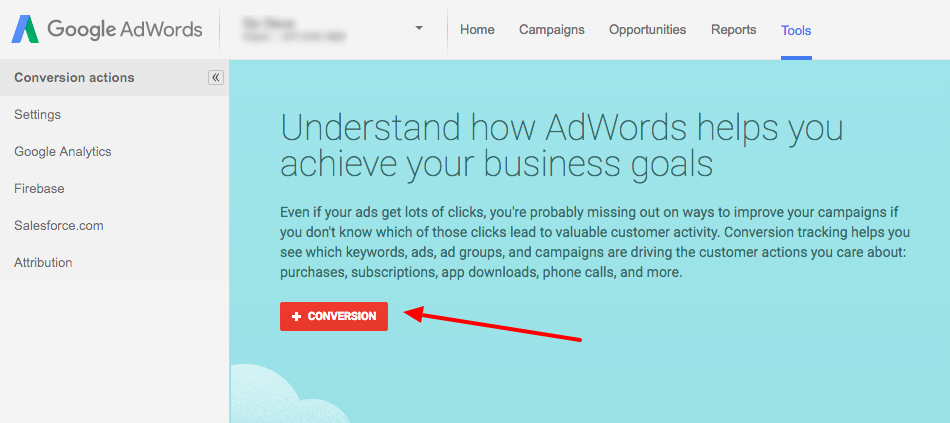
In your AdWords account, choose Tools and then Conversions

adwords-conversion-tracking-link

And then you want to choose + Conversion

setup-new-conversion


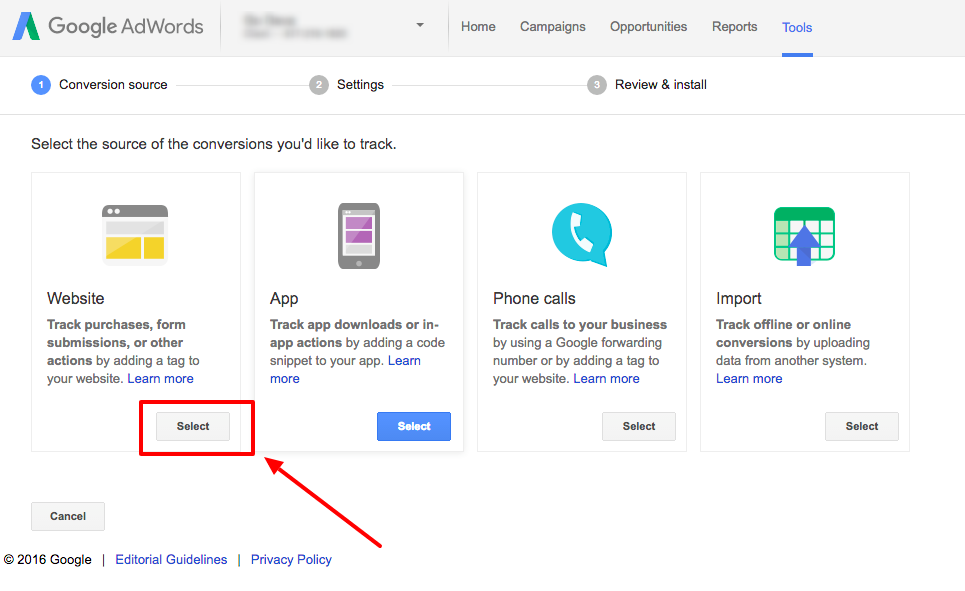
Then choose Website Conversion


adwords-conversions

Then choose the following settings:

  • Name: Shopify Sale
  • Value: Each conversion has a different value. If there’s no value, use $1
  • Count: Every Conversion
  • Conversion Window: 30-day conversion window
  • Category: Purchase/Sale
  • Include in “Conversions”: Yes
  • Attribution model: Use “Last Click” model

choose-conv-settings


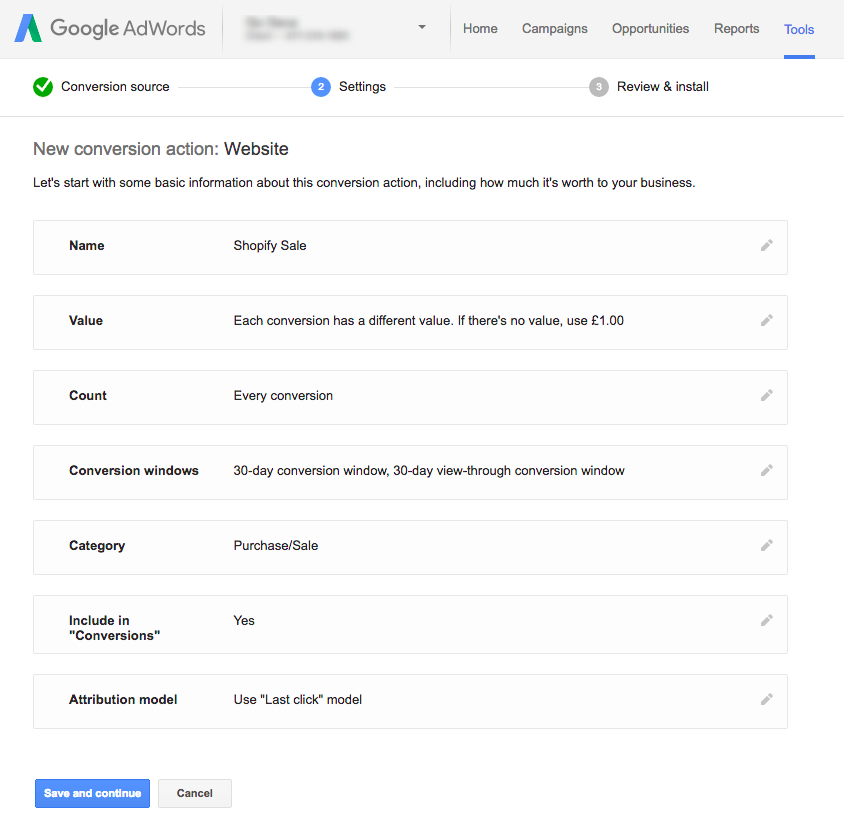
Then choose Save and continue

At which point you will get the snippet of code that you need:

conv-code-page

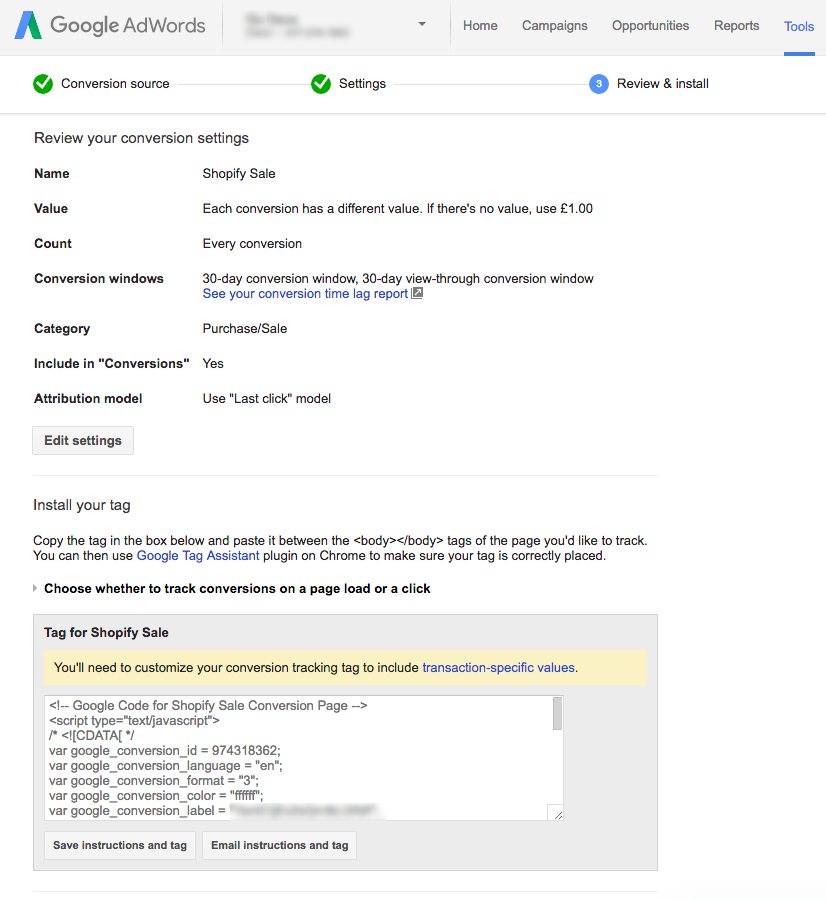
The code will look like this:

<!-- Google Code for Shopify Sale Conversion Page -->
<script type="text/javascript">
/* <![CDATA[ */
var google_conversion_id = your-id;
var google_conversion_language = "en";
var google_conversion_format = "3";
var google_conversion_color = "ffffff";
var google_conversion_label = "your-label";
var google_conversion_value = 1.00;
var google_conversion_currency = "USD";
var google_remarketing_only = false;
/* ]]> */
</script>
<script type="text/javascript" src="//www.googleadservices.com/pagead/conversion.js">
</script>
<noscript>
<div style="display:inline;">
<img height="1" width="1" style="border-style:none;" alt="" src="//www.googleadservices.com/pagead/conversion/your-id/?value=1.00&amp;currency_code=USD&amp;label=your-label&amp;guid=ON&amp;script=0"/>
</div>
</noscript>


Now we want to modify it with the following changes:

We want to change the line:

var google_conversion_value = 1.00;


to

if ({{ subtotal_price }}) { var google_conversion_value = {{ subtotal_price | money_without_currency | remove: ',' }}; }

Lastly, you’ll want to edit the part of the noscript tag that contains the value. Change

value=1.00

to

value={{ subtotal_price | money_without_currency | remove: ',' }}


Making the above code look like this:

<script type="text/javascript">
/* <![CDATA[ */
var google_conversion_id = your-id;
var google_conversion_language = "en";
var google_conversion_format = "3";
var google_conversion_color = "ffffff";
var google_conversion_label = "your-label";
if ({{ subtotal_price }}) { var google_conversion_value = {{ subtotal_price | money_without_currency | remove: ',' }}; }
var google_conversion_currency = "USD";
var google_remarketing_only = false;
/* ]]> */
</script>
<script type="text/javascript" src="//www.googleadservices.com/pagead/conversion.js">
</script>
<noscript>
<div style="display:inline;">
<img height="1" width="1" style="border-style:none;" alt="" src="//www.googleadservices.com/pagead/conversion/your-id/?value={{ subtotal_price | money_without_currency | remove: ',' }}&amp;currency_code=USD&amp;oid={{order.order_number}}&amp;label=your-label&amp;guid=ON&amp;script=0"/>
</div>
</noscript>

Next, we want to add some code to track order IDs. This is the bit that will prevent us registering duplicate conversions in AdWords. See the Google article for extended details on how it works.

We will add the following line:

if ({{ order.order_number }}) { var google_conversion_order_id = "{{ order.order_number }}"; }

Essentially the code says; check if the page returns an order number, and if so, pass it to the variable.

You may want to check your order number setup in Shopify, because if you edited it, and want it to match up, you’ll need to add an extra prefix. I don’t think you need it to match up 100% though. All this functions serves to do is ensure the same order number can’t be counted twice.

Then we want to add the corresponding noscript tag:

&amp;oid={{ order.order_number }}

Making the code look like this:

<script type="text/javascript">
/* <![CDATA[ */
var google_conversion_id = your-id;
var google_conversion_language = "en";
var google_conversion_format = "3";
var google_conversion_color = "ffffff";
var google_conversion_label = "your-label";
if ({{ subtotal_price }}) { var google_conversion_value = {{ subtotal_price | money_without_currency | remove: ',' }}; }
if ({{ order.order_number }}) { var google_conversion_order_id = "{{ order.order_number }}"; }
var google_conversion_currency = "USD";
var google_remarketing_only = false;
/* ]]> */
</script>
<script type="text/javascript" src="//www.googleadservices.com/pagead/conversion.js">
</script>
<noscript>
<div style="display:inline;">
<img height="1" width="1" style="border-style:none;" alt="" src="//www.googleadservices.com/pagead/conversion/your-id/?value={{ subtotal_price | money_without_currency | remove: ',' }}&amp;currency_code=USD&amp;oid={{ order.order_number }}&amp;label=your-label&amp;guid=ON&amp;script=0"/>
</div>
</noscript>


At which point we’re nearly there.

Finally, we have the option to add some further code.

Shopify have a snippet of liquid code called first_time_accessed (more info on it here). Code placed within this statement *should* only be displayed once.

Since testing it, I’ve found its not 100% reliable. Hence adding the above order ID code.

But it’s better than nothing for the other codes in your checkout code. Ones that don’t have an order ID parameter that can be added (Bing comes to mind).

All you have to do is surround your conversion code with the statement:
{% if first_time_accessed %}

and then close it with:
{% endif %}

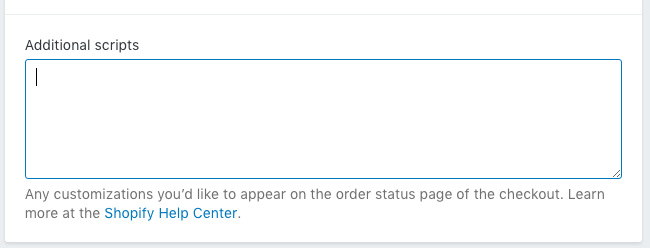
All this code goes in the Additional Scrips box in your Shopify dashboard. This section can be located by going to Settings -> Checkout. Scroll down until you find this box:

shopify-additional-scripts-box

If any of the above isn’t clear, leave me a comment, and I’ll clarify + improve it.

Amazon Keywords (Backend) – How to Optimize

July 15, 2016 By John King Leave a Comment

Amazon backend keywords provides up to 5,000 characters to customize. But how best to use them?

Backend keywords

What you don’t want to do, is to think of these backend keywords like the old <meta> keyword tags in HTML, and just try stuffing everything you can think of into them.

You want to ensure your main Amazon keywords are in at least your product name, features (bullet points) or description

Especially your money keywords. For example, if you sold garlic presses, you’d want to prioritize putting popular keywords like ‘garlic press’, ‘garlic mincer’ and ‘garlic squeezer’ into your listing.

At which point, the backend keywords should be for any keywords you don’t have in your listing. There’s no need for duplicates.

Amazon explains this via the help section of their site:

Amazon Backend Keywords - Explanation for usage

Amazon’s take on backend keywords – see more


Google Analytics Virtual Pageviews – How to Setup

June 25, 2016 By John King Leave a Comment

Google Analytics virtual pageviews have a whole bunch of uses.

Recently I was setting them up for this blog, in order to track some outbound links, and thought it was worth sharing how to do this.

The main uses I can think of are:

  • To track outbound links
  • To track clicks on a specific link on a page (rather than just tracking visits to the page, which could come from multiple sources)
  • To track sending a message on a form

Using the most recent Google Analytics script (analytics.js), the syntax format for virtual page views is:

More info on the GA site – https://developers.google.com/analytics/devguides/collection/analyticsjs/pages#pageview_fields

How would this look if we wanted to make a specific URL trackable?

<a href="www.example.com" onclick="ga('send', 'pageview', 'vpv/example-url');" />

Notice how we have specifically added an onclick event, and passed it the name of a page view to fire.

Because virtual pageviews are not ‘real’ page views, it helps to have a way to filter them from your metrics. In the example above I’ve used the prefix /vpv/, which we can easily filter for in analytics if we want to. That way we’ll know everything with /vpv/ is a virtual pageview.

What’s really nice about this, is that you can quickly check if they’re working, but going to the Real Time part of Google Analytics:

Screen Shot 2016-06-25 at 09.55.14


What is ACoS – Advertising Cost of Sales – What does it mean? Amazon FBA

June 25, 2016 By John King Leave a Comment

Advertising Cost of Sales (ACoS) is a term used by Amazon for their sponsored ads. ACoS is not common PPC jargon, so don’t be surprised if you haven’t heard of it.

The easiest way to think about ACoS is this. Once you have your products profit margin as a percentage. You would then deduct the ACoS percentage to get your final margin.

E.g. Goods retail for $30, profit margin is 40% ($12), and ACoS is 10% ($3). You’d then take home $9 as profit on sales from your ads.

Another more formal definition:

The higher your ACoS, the higher your ratio of ad cost to sales revenue. The lower your ACoS, the lower your ratio of ad cost to sales revenue. Ideally you want as high a sales revenue figure as possible, with as low an ACoS as possible.
ACoS = 100* (Total Ads Spend ÷ Total sales)

So… if you spent $10 on advertising and it resulted in a single sale of $40, your Advertising Cost of Sales would be 100*10/40 = 25%.

Example screenshot below showing the ACoS in the far right column.

Advertising Cost of Sales (ACoS)

Advertising Cost of Sales (ACoS) in the Amazon Seller Central dashboard

To recap:

ACoS = 100 * (Total Ads Spend ÷ Total Sales)

Additional Comment on ACOS

When you’re selling on Amazon its super important to have a spreadsheet where you calculate all your costs (manufacturing, inspection, shipping, import tax, Amazon fees) and therefore know how much profit is left on each sale. At which point, you want to know how much you can “afford” to spend on Amazon ads, and still be left with profit.

If you find you’re only breaking even on the ads, they can still be worth pursuing (which is a weird thing in the world of ads!). The rationale would be that the extra sales would improve your Best Seller Rank (BSR) and therefore result in more organic sales.

The only scenario where that may not be of use, is where you’re already top of the search results for the keywords that you want. But actually, because ads take precedence on the results page over organic results. Even if you’re at the top organically, you’d likely want to run product ads in addition.

>> To learn more about running profitable Amazon PPC ads, I’ve written a detailed blog post on how to build and optimize your Amazon Sponsored Product campaigns.

Adding Facebook Pixel AddToCart or ViewContent Actions for Shopify

March 28, 2016 By John King 7 Comments

Previously I wrote about how to setup Facebook conversion tracking on Shopify using the new pixel.

To keep the article simple, I left out discussion of other actions that you can track. Taking the 80:20 approach, the MAIN thing you want to get right in your tracking is sales. So that was the focus.

Once that’s correct, then you can move on to other actions. A particularly useful one to track is “AddToCart” – this lets you know if your Facebook campaigns are on the right tracks. If you’re getting lots of add to carts, but not purchases, then you know there is interest… but something is getting in the way between a customers intent and their follow through.

There are a few ways to implement the AddToCart action.

You can take this snippet, and add it to your cart.liquid page:

<script>
fbq('track', 'AddToCart');
</script>

Because the cart.liquid uses theme.liquid – you don’t need to add any more code than that.

Side note: Some themes don’t use a separate cart page. Instead they use Javascript to show the cart as a popup/sidebar. If this is the case then you’ll need some more complex code. Contact me if you’d like a quote on having this setup.

Alternatively, if you want all your code in one neat little bundle, you can do this:

<script>
!function(f,b,e,v,n,t,s){if(f.fbq)return;n=f.fbq=function(){n.callMethod?
n.callMethod.apply(n,arguments):n.queue.push(arguments)};if(!f._fbq)f._fbq=n;
n.push=n;n.loaded=!0;n.version='2.0';n.queue=[];t=b.createElement(e);t.async=!0;
t.src=v;s=b.getElementsByTagName(e)[0];s.parentNode.insertBefore(t,s)}(window,
document,'script','//connect.facebook.net/en_US/fbevents.js');

fbq('init', '52426583439xxxx');
fbq('track', 'PageView');
{% if template contains 'cart' %}
fbq('track', 'AddToCart');
{% endif %}

</script>
<noscript><img height="1" width="1" style="display:none"
src="https://www.facebook.com/tr?id=52426583439xxxx&amp;amp;ev=PageView&amp;amp;noscript=1"
/></noscript>

The above is what your basic Facebook tracking script would look like, with an extra section which has an “if” statement. The statement says… when the page gets loaded, if the template contains the word “cart”, then add this bit of code (which is your AddToCart code), and if the page isn’t your cart page, that code doesn’t load.

There are further Facebook tracking actions beyond AddToCart. This list is as follows:

Facebook Pixel Tracking Actions

Another ‘action’ that you might want to track could be views of certain pages. This could be “all” product pages, or perhaps pages of a certain product.

If you wanted to be able to target all visitors of a product using the ViewContent tag, then you could add this snippet to the product.liquid template:

<script>
fbq('track', 'ViewContent');
</script>

Alternatively you could integrate it all into the one tag using something like:

<script>
!function(f,b,e,v,n,t,s){if(f.fbq)return;n=f.fbq=function(){n.callMethod?
n.callMethod.apply(n,arguments):n.queue.push(arguments)};if(!f._fbq)f._fbq=n;
n.push=n;n.loaded=!0;n.version='2.0';n.queue=[];t=b.createElement(e);t.async=!0;
t.src=v;s=b.getElementsByTagName(e)[0];s.parentNode.insertBefore(t,s)}(window,
document,'script','//connect.facebook.net/en_US/fbevents.js');

fbq('init', '52426583439xxxx');
fbq('track', 'PageView');
{% if template contains 'cart' %}
fbq('track', 'AddToCart');
{% elsif template contains 'product' %}
fbq('track', 'ViewContent');
{% endif %}

</script>
<noscript><img height="1" width="1" style="display:none"
src="https://www.facebook.com/tr?id=52426583439xxxx&amp;ev=PageView&amp;noscript=1"
/></noscript>

So hopefully that helps you if you were unsure about how to track those actions via Facebook. If you need any further help setting things up, I can take care of this for $

« Previous Page
Next Page »

Popular Posts

First Time Here?

Hey and welcome to the site.

PPC Wins is a site dedicated to sharing with you useful tips and advice for getting the most out of PPC campaigns.

If there is a topic you would like to see covered please get in contact.

Categories

  • AdWords
  • Amazon
  • eCommerce
  • Facebook
  • Google Analytics
  • Google Exams
  • Lead Generation
  • Uncategorized
google-adwords-certified-partner2
BingAds_Accredited_Badge (1)

Copyright © 2022 ppcwins.com